Showing posts with label top. Show all posts

Tuesday, September 11, 2012

darling revisited.


The pattern should be all too familiar by now... or is it?  Yet another Darling Ranges (not) dress.  This time, since I'm obviously not pregnant (hopefully it's obvious anyway) any more I modified the front the same way as the back.  That is, instead of being big gathered rectangles under the bodice pieces instead the pieces are fitted and shirt length.


A bit too fitted, unfortunately.  This is the first time I've used this pattern since having the baby so I wasn't sure what I was doing.  Obviously the biggest issue is that another (larger) FBA is in order but a bit more room in the hips would be good too.


All in all, though, I'm pretty enamored of this shirt.  Perhaps someday it will actually fit =(


I actually cut the back as one piece so I wouldn't have to worry about pattern matching or any such silliness. I think it'd be really cute with the top back bodice split into a yoke sort of deal.  Am I going to make more of these with a revised pattern?  You bet! 


Look at those pretty insides!  All flatfelled seams except for the underbust seam...


...and the set in sleeves.  I couldn't figure out what kind of seam finish would work here so I just zigzagged the seam allowance.  It makes me sad they can't be all purdy like all their neighbors =(  


Isn't there a better way?

Summary:
Pattern: Highly modified Darling Ranges dress by Megan Nielsen
Fabric: Some yardage from the thrift, about half of what was there.  A thin, crisp, cotton I think.  $4 or $5 for the whole thing and I used about half.
Notions: Buttons from the stash. Free since I don't know where they came from.  I certainly didn't pay for them.
Techniques used: Buttonholes, flatfelled seams, bias tape neckline and bound seams
Hours: A few...  Not really too bad, though
Will you make this again? So many times.  I'm pretty sure
Total cost: Half of $5: so $2.50
Final thoughts: I love it, I hope I lose some weight and can wear it all buttoned up proper

Tuesday, September 4, 2012

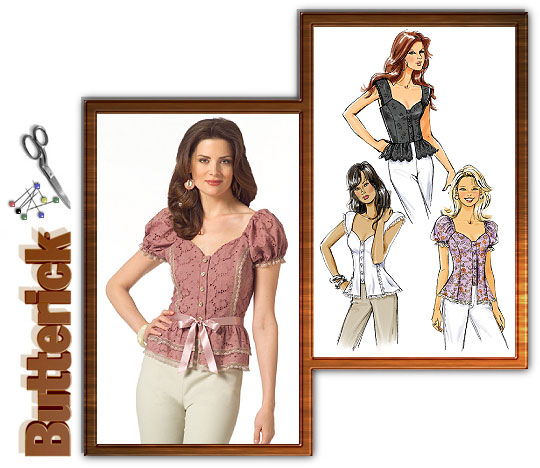
damn you butterick 4988

It's not for the faint of heart.  I'm not sure what I was thinking, other than that this pattern was 50 cents, uncut, and my size.  I think my recent fascination with Jane Austen has drawn me towards this sort of top, though I'm not sure why.  Something about the buttons, neckline, and poofy sleeves.


Only now do I see that this pattern is less Jane Austen and more Louis VIII.  The sleeves are so puffy it looks like they're stuffed with marshmallows. 


 And can you see those wrinkles under the bust?  It's because the top fits in the bust and nowhere else.  I checked the measurements and didn't think they were too far off, but the bust is tight and everywhere else is loose.

The top is constructed with princess seams so I feel like it should be pretty easy to take in, but where to start?  I'd have to rip out and take in the facing first because, while the bust fits, there's some major upper back gaping.  And those damn back wrinkles that I always get when I wear woven tops!


Oh my God, just look at those sleeves!  But to add to my frustration the entire bodice is easily 4 inches shorter than I consider wearable before hemming!!  So even if I did fix the sleeves and the sizing I would still have to find a way to lengthen it.  I do have a little over a yard left of this fabric, but honestly is it even worth it?!


Oh yes, and there's an  inexplicable flare out at the bottom.  So not only is it too short but it flares out like some kind of crazy anime outfit.  As a matter of fact made up in the right color scheme it might be full on Sailor Moon status.

Do I dream of dressing up like Sailor Moon?  Maaaaybe....
At this point I'm ready to consider this a muslin and move on with my life.  Unfortunately while I've read a lot about fitting on the interwebs I don't really know how to make more complicated changes to a pattern using a muslin.  Or rather, I have a guess and I'm just not up for that kind of commitment right now.  I'm keeping this as a learning tool, though, and hopefully will return to it someday soon.  You know, when I'm bored (hahahahaha).

Basically I need to rip it apart and make some alterations which I can translate to new, muuuuch longer pattern pieces


I think that the most concerning aspect at this point is that the shoulders are seriously elasticized.  Meaning that the only thing keeping the bodice in place is friction and faith.  With a baby constantly trying to get in my shirt and a toddler who just likes to roughhouse that's not enough assurance.  

On the bright side I did successfully lengthen the button band.  The original pattern has the button band stop about belly button height (Is that weird?  Yes.  Should this have been a warning sign?  I think so.) but I prefer a more traditional length (as in, uhh.. the same length as the shirt).  I figured I'd hem it together with the shirt bunow I'm thinking there's a better way to do it.  I intend to consult with Sewing for Boys as it's the only sewing resource I have that's helped more than it's caused me trouble.

I actually think that it's gotten me into trouble, though.  It makes me think I'm a better seamstress than I really am, thus leading to moments like this one.  What needs to happen is those girls need to write a book called Sewing for Women.

'

And I think that's about all there is to say about that.  Unless you've got something funnier: let's hear it!

Sunday, August 26, 2012

striving for perfection

Or perhaps I'm still just cleansing my palate with another quickie.  Another Simplicity 9164 inspired peasant top, from the same material as a matter of fact.

First                                               Second
I don't know if you can really tell but I added some width to the sleeves and maybe the front (I can't recall) as well as adding some depth to the front top bodice (which I said I would).  I think it's better but next time I will take in the underbust area a bit so hopefully it'll look a bit nicer (and lay a bit more under bust instead of on it) and I think add some extra volume to the top bodice piece for more drape and gathers.

This is the end of this sheet, though (except for one other project yet to be blogged) so I'll be moving on to  other fabric for this pattern.  I ran out of thread, too and since there's no more sheet I couldn't bring myself to go buy thread just for the top stitching on this one shirt so I used light pink.  It's on all the hems, so at least it matches, but I imagine this is destined for the dye pot.  The first purple peasant top is actually already in there so pics of that when its dry (excitement)!

First                        Second

The back is pretty much the same but you can see the sleeves are more gathered on the second one.

Summary:
Fabric: The remains of an old top sheet
Notions: Some 1/4" elastic.  I bought 8 yards just a few weeks ago and I'm already almost out!
Techniques used: Nothing new unless you count fitting
Hours:  It's hard to say what with the nearly constant interruptions but a few?
Will you make this again? Absolutely.  I love the style and I see longer sleeves and better fit in the future
Total cost: Maybe $1 for elastic (that's assuming it used 2 yards which I doubt very much.
Final thoughts: I'm getting there with this pattern, but my first three are all wearable and that's encouraging even if they aren't perfect


With my little helpers (this is the second one)
By the way that makes two sheets that I've finished this week.  Yeah!  Look at me bustin' that stash.


Saturday, August 18, 2012

to dye or not to dye...

See.  I told you it fits.  Here is a much more successfully executed peasant top based on the vintage Simplicity 9164 dress pattern.    


To recap here are the changes I made to turn a too small dress bodice into a tee shirt pattern:
I took about an inch out of the top front, top back, and each sleeve.  I thought as is it would be too much visual weight up top.
The back pieces are cut on the fold since a zipper would be superfluous
I extended the bottom bodice pieces flaring out at the hips, and adding an inch to the width
I'm also trying to figure out an order of operations which will give the sleeves a neat finish without requiring me to change to the twin needle more than once.


Here you can clearly see where a little extra length in the top bodice is necessary.  I don't know whether it would be better to curve the bottom of the piece downward or add length throughout and add darts on the sides.  Do people even use darts on knits?  I've never seen one in RTW clothing... 


Back wrinkles... typical.  Do I care enough about it to make an effort?  Probably not.  It is a tee shirt after all and fits at least as well as the RTW ones in my closet.  I love the way the gathering looks all around the back and sleeve.


And here you can see the lovely sleeves as opposed to the train wreck sleeves from yesterday.  Oh, and the inexplicable stink eye.  I suppose the camera was irritating me?  

I think the real question here is: to dye?  or not to dye?  Is this my color?  
I originally intended to over dye it a darker purple when finished but now I'm not sure.
It's a medium shade heathered purple whereas I normally tend towards darker shades.  The top pic is probably the most accurate.  

Looking at these pictures and having worn the shirt around a bit today I'm warming up to it.  I wonder, though, will I always look at this shirt and think of my friend's old sheets?  Or worse: will everyone else?  
Do I look like I'm wearing bedding?

On the bright side, this shirt is made of an old top sheet my friend gave me when she moved to Spain (they're the jersey knit sort) which means this is another free shirt!  Yay for free stuff =)

Hawaii (Simplicity 9164)

Finally a finished object.  Quite possibly the first moderately satisfactory FO since little miss Em was born (aside from many, many diapers and diaper covers).

Awkward self timed pic
The pattern is a (highly) modified version of Simplicity 9164: a peasant dress for woven fabric.  I picked this pattern up for 99 cents at the thrift.  Of course it's a size I haven't fit into since, well, probably ever.  I bought it intending to resize it (which could happen, someday...)


The one on the right, should you be in doubt
I had to buy it just because I love hippie style and this dress, straight from the '60s or '70s certainly qualifies.  A distinct lack of sewing mojo has delayed progress but I finally traced the pattern and guess what...

Skeptical at first, I love the gathers on the back
It's got about 10 inches of ease built in.  I actually pinched out a bit from the top bodice and lengthened the bottom bodice pieces adding a few inches for the hips and version 1 fit!  (More to come on that later, hopefully).

Wait, if it fits what's with that sneaky side panel?  I did something stupid.  You may remember seeing this knit before here.  Which means I've used it before.  Which means I knew perfectly well that for this material to stretch the pattern on it has to be sideways.    Knowing this I stupidly brazenly cut the pieces out with the stretch going the wrong way.  

You can't see the print too well but I thought this pic deserved another view anyway
My line of reasoning: Hey, this pattern's for a woven right?  So the knit will still be stretchier than a woven would.  
 Hmm. Yes, but this pattern is not in my size it's in a much smaller size.  Logic fail.  Almost a total fail as a matter of fact but inspiration struck.


And there it is.  I cut side panels complete with a small amount of poorly executed ruching (at that point the project was halfway in the trash anyway) and voila!  It fits.  Wasn't this sort of ruching on trend pretty recently?  So I just look moderately out of date and not inept at sewing.


You can sort of see in this shot that I should have tapered down to nothing at the sleeves since the elastic was already sewn and now the sleeves are too loose.  But all in all, for a project saved from eternity as a wadder I'm pretty happy with it. 

I already have the next one cut out and have added a bit of width to the lower bodices just to be on the safe side.  From now on, though, I'll add a bit of vertical length to the top front bodice pieces as it doesn't hit quite at the top of the rib cage (darn these unsupportive nursing bras).

Top front issues
I wore this shirt all day in the crazy heat running errands and it is super comfy, nursing friendly, and I think pretty flattering (it fits at least).  So all in all: win!

And here, I suppose, there's some sort of inadvertent (and bad) America's Next Top Model happening. I'm not sure how this pose happened, I know it wasn't intentional haha.


By the way, this fabric used to be the sheet on my bed in high school (I never throw anything away, much to my husband's chagrin) so this tee was basically free if you don't count the cost of the pattern!

Tuesday, June 26, 2012

retro darling.


Now with sleeves =)  Yet another maternity top based on the Darling ranges dress pattern.  I used the same old pieces; nothing new.  That is, I used the same pieces I used for this one, meaning the back is cut out with curved sides as opposed to back darts.  I think I may have added a bit to the FBA over DR the first, though it's definitely not the hot mess I ended up with on the second one.

I think?  That's right...  This top has been in time out for at least two weeks.  Why?  Because as I finished sewing the seams on this top I had two revelations: this material is polyester (I think, it seems to fit with the print, no?) and polyester does not stretch.


I saw the material at the op shop and resisted it for two weeks.  Finally the oh so '60s retro print won out over my common sense and I bought it.  In the store I actually thought it was brown, red, orange, and white.  Upon closer inspection in better light I believe it is purple, not brown.  I wish it was brown though =(  Wouldn't that be an awesomely unusual (and just bearably awful) color combo?


You can kind of see that there's a lot of fabric pooling on the lower back, which I've noticed a problem with before.  I have no idea what to do about it though =(

Obviously a pattern this crazy needs a simple pattern with clean lines.  That's what I love so much about the Darling Ranges pattern; the busier the fabric the better!  It just works.  At least I think so and a few other people do too.


Of course there's nothing to be done about looking like a giant beach ball at this point...

Unfortunately this material, as I mentioned, does not stretch as much as cotton does.  I've always heard that woven fabric doesn't stretch, but it's a lie!  It looks like buttons are about to go flying.  I don't think they are, but it hurts my self esteem to see people donning safety goggles at my approach.  You can kind of see that here, but it doesn't look as bad as I imagined, so maybe it isn't?


I love it anyway.  I can't wait til I can wear it.  That's right, I don't care it's supposed to be maternity wear.  I fully plan on rocking this shirt post-baby.  As a matter of fact I might even decide I don't care about potentially dangerous projectiles and wear it now!  The print, the pattern: it's just so retro.  Since it seems to be synthetic I expect it won't breathe well but I've worn it around the house quite a bit and have no evidence to support those fears.


I went for bright red topstitching just to jazz things up a bit.  I love the way it looks, I think it really brings out the red/orange part of the print.

One of my absolute favorite things about this shirt is that the fabric seems to be actually retro; like decades old!  It certainly smells like my great grandmother's house when it's ironed.  It's like a time capsule, but more fun because it's crafty =)  I also used some more old stash buttons.  I would've used bright red to match the thread if I'd had enough of those.  Interesting thought: the buttons may actually be the same age as the fabric.  Yay for using what ya got and making do.  BTW where did all these buttons come from?!

Wednesday, June 20, 2012

prairie darling


I told myself it was pointless to make any more maternity clothes...  But I found myself wanting to wear my first darling ranges top all the time (which apparently isn't legit; you're supposed to wash clothes between wearings I supppose?) so I decided to just bite the bullet and make another one.

This fabric is from the op shop.  It lured me in with it's brownness and cutesy floral pattern that is just too Little House on the Prairie.  However, as soon as I got it home I decided it isn't really adult garment appropriate.  The nice thing about being pregnant, though, is that maternity clothes aren't the same as regular adult garments: they're overly cutesy and, more importantly, temporary.

So was born the prairie darling...


I added to the FBA this time and it fits quite well... except that the way I did it was kinda cracked out and I somehow made the armholes a bit tight?  I was trying to do it from memory and definitely did something weird.  Oh well, it's certainly still wearable.

On my first one I cut the back out in a curved shape since that's how my back is shaped.  The sides kind of pull and twist weirdly, though.  I guess it's got something to do with bias and grain and all that.  For this one I did back darts instead.  Unfortunately, as you can see, I didn't take enough out and there's some weird excess fabric at the bottom of the back.


 Actually I think I'm beginning to sense a theme here...  Maybe that's what a swayback adjustment is for?  I actually think the first DR top has the least problem.  Maybe because the seams are on the bias it drapes better.  I really don't know.  I am tempted to cut another one like that to see...

And here are some guts: french seams and pretty bias tape.  I made it myself =)  It's so cheerful I love it!


All in all I'm happy with it, especially since the front closes.  I could probably make some improvements if I were to make another one, but I don't know how likely that is since I'm due any time now =)

Saturday, June 9, 2012

diy maternity: darling sans sleeves and self drafted skirt

I'm so happy to have discovered diymaternity during this pregnancy.  It hadn't really occurred to me to make my own maternity clothes; knitting takes so long and pregnancy bodies change so fast it's hard to keep up.

Quite conveniently, the same way I took up knitting during my first pregnancy (uhh.. obsessively?) I took up sewing during this one.  It's easier for me to learn new skills when I'm not worried about creating timeless masterpieces.  I'm certainly not planning on wearing maternity clothes forever (hopefully not even for much longer at this point) and cute little baby clothes are quick to make and quick to be out grown.

The brief hot spell we had prompted me to make this:


A maternity skirt.  Out of such pretty pink eyelet material.  I used an existing skirt as a template, but it's basically just ten long skinny trapezoids sewn together.  It produces a nice circle skirt effect. Except I totally ran short of yardage with two pieces to go so I cut 8 trapezoids and 8 reeealllly skinny rectangles. It would've been a bit fuller had I had enough fabric.  I'll definitely make a non-maternity one of these soon in anticipation.

My mom said it doesn't need to be ironed.  But omygato can you  believe that wrinkling?


There, that's better.  I cut some white lining material I already had into a regular A-line shape.  I actually didn't even hem it, I just cut it shorter than the skirt and zig-zagged over the edges.  

Lazy (1000).  

Each piece is slightly convex at the bottom so I couldn't figure out how to hem.  Thankfully the Reader's Digest Complete Guide to Sewing told me to do this:


It took me awhile to slipstitch all that bias tape down, but it was worth it.  I didn't have anything even remotely close to that pink in stash so I used my old Carebear's sheets.  The sheets had certainly seen better days, so I'm glad I found a use for them.  Plus it cheers me up everytime I see the hearts peeking out around the hem.


I used an old too small knit shirt for the belly band, but I should've used something thinner.  This one's a bit bulky.  Actually the only thing on this skirt I paid for/bought new was the lining so the project set me back about $2.  My grandmother bought the fabric for me last time I visited her along with the notions and pattern for a dress (all in a size that I'm unlikely to ever see again, let's be honest).  Here's the belly band in action:


I need to clean that mirror =(  Belly bump!  37 weeks just about.


I also decided to go sleeveless for the Darling Ranges top... so you've seen this before but this time it's actually finished!  The hot spell really inspired me; too bad it didn't stick around.  


I basically redrafted every single pattern piece:
  • The front and back I shortened to be closer to an empire waist
  • The front also got an FBA (which was not big enough and will have to be tinkered with for the next one)
  • The back I cut to be fitted.  I took quite a bit out and added some shaping.  Unfortunately I didn't use darts to shape it but instead just cut the sides in a bit around the waist.  This causes the side seam to pull oddly.  Lesson learned.
  • The front I cut longer than the back (though obviously shorter than the dress version) to allow for belly coverage.  I think I cut it a bit on the long side.


It didn't photograph too well, but I actually really like it.  It's perfect for wearing a light shrug or sweater over.  Plus I'm always hot now anyway so I needed something cute and sleeveless for the remotely warm days.


I actually wore this outfit out that day: me made shrug, me made Aeolian, and me made Darling Ranges top.  It makes me happy when I can pull something like that off =)  And it's certainly been too long.  Yay for DIY maternity clothes!