Showing posts with label darling ranges dress. Show all posts

Monday, July 29, 2013

Blue roses, darling ranges

Continuing with the trend of ostentatious monikers for moderately mundane garments.  Now with a sprinkling of alliteration!


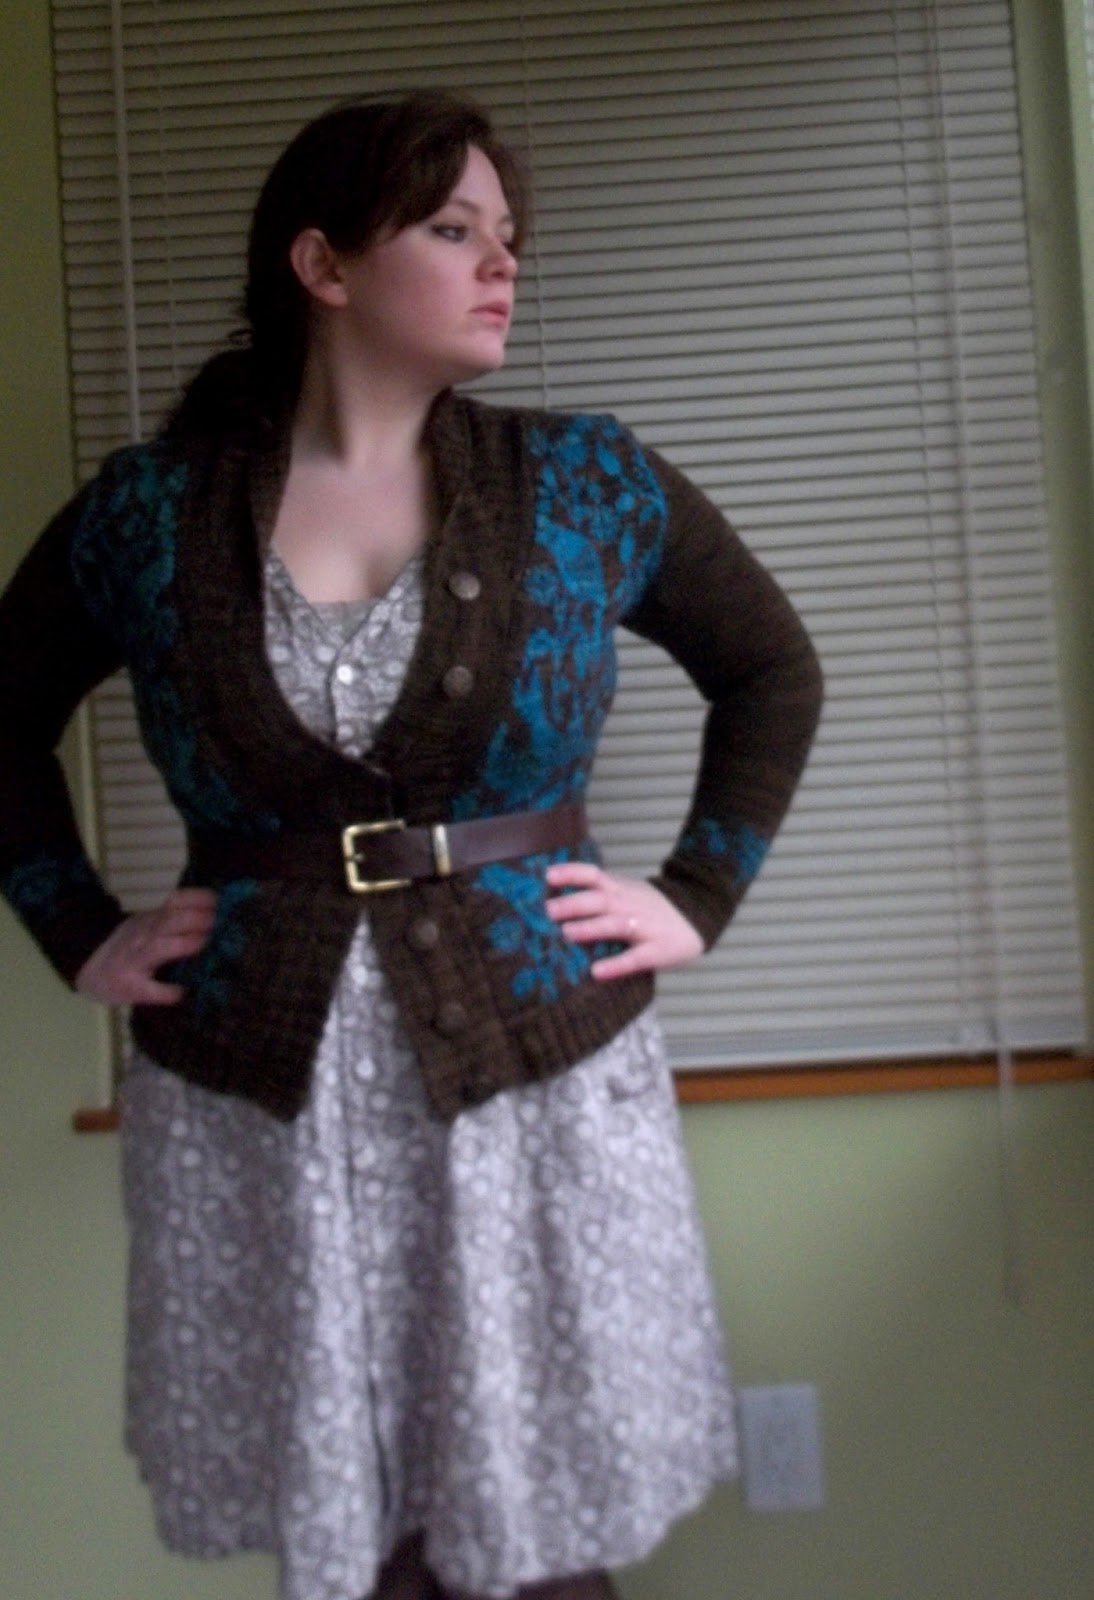
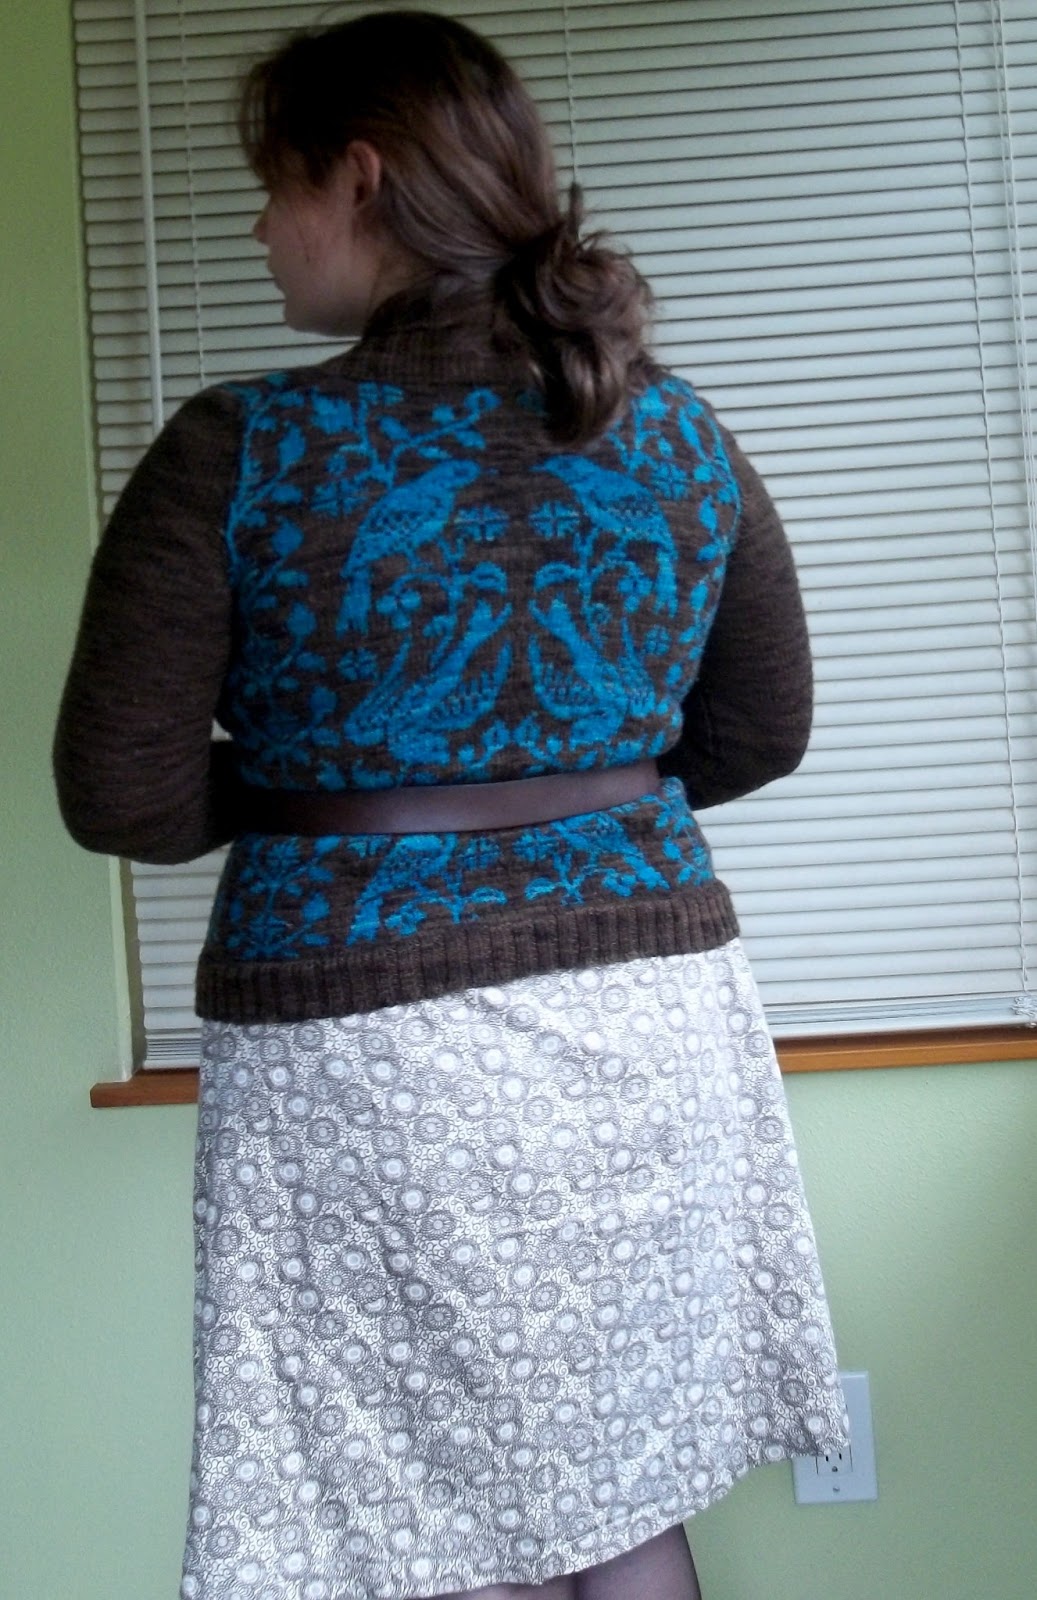
I think it's pretty obvious that this is yet another darling ranges dress.  Every time I make this pattern I tweak it a little bit.  Next time I'd like the skirt to be a bit fuller.  Or maybe a lot fuller!  Also, pocket fail!  They're oddly positioned for the shape.  If they were more slanted towards the floor they would work.  Duly noted.  


The fabric (oh!  The fabric!) was a find at the thrift.  For a cool dollar fifty I just couldn't pass up the pretty print... even though I could see it wasn't in great shape.  It turns out I totally underestimated how badly preserved it was.

In addition to the weird discolored stripe running along one edge there were several small holes... and one big one :P Based on the print, obvious poly content, and poor condition I can't help but wonder if this is real vintage fabric.  I think people have a tendency to call anything from the thrift vintage.. but I'm pretty sure this shit's actually old.  Kind of cool and kind of crappy all at the same time!


I originally thought I'd be lucky to eek out a blouse but through some creative pattern placement (no cutting on the fold happening here!) I managed to get all the pieces for this dress with just a few scraps to spare.  Seriously, there's barely enough for quilt scraps!


I think the fit is pretty good in the bodice.  I think I raised the neckline just a smidge, as I sometimes do when making this pattern.  Even so I pretty much always wear a camisole under it.  As opposed to, you know, just puttin' it all right out there.


The skirt is not such a great fit.  As I mentioned above, a fuller skirt would have been nice.  The skirt fits just fine in reality, but the pockets are not as useful as they would have been if the skirt was fuller.  Facepalm!


I've made this pattern so many times that there's really not much more to say about it.  Except that it's great!  I love it.  It's just perfect for climbing ladders...


Or dancing.  Yes this is how I dance and it's why my husband never takes me dancing =(


Or even doing Scarlett O'Hara impressions.  Bad Scarlett O'Hara impressions.


My life goal is to make a dress out of curtains so that I can actually say "I saw it in the window and just had to have it!"


Total cost: maybe $3
Notions: buttons and bias tape... and interfacing.  Seriously, interface the button placket, just do it!  You're welcome.
Happy: So very
Make again: I feel like after so many iterations it'd be crazy to keep going... or maybe it'd be crazy to stop?


Tuesday, May 21, 2013

Paisley Darling!

You may remember the sneak peek of this shirt from last week.  So here's the scoop:

Horrid MySpace quality photo
I bought this sheet at Goodwill with the express purpose of injecting some 60's paisley shirt love into my wardrobe.  I found a Threads button up shirt pattern on clearance at the local fabric store and figured for $2 it'd be worth a shot.  Sadly the result was lackluster.  You saw it briefly (and blurrily) at the end of Me Made May Week 2 and once I get the sleeves fixed you'll see it some more.  After spending sooo much time (collar stands are hard, yo) on something so lackluster I wanted some instant gratification so I returned to an old favorite.

Can you feel the happy?  Not really, but it's there.
As you can probably guess from the title I used the Darling Ranges dress-turned-shirt pattern with the collar piece from some random dress pattern I haven't even tried out yet.  The collar is a bit, erm, large... but I've decided I like it.  It's retro, if you will.  And you will here, because this is my blog which means I make the rules here.

Oooh... So pointy
Besides, all the better for collar popping amiright?

Totally epic collar pop
Since I've made this pattern in it's various forms about a bajillion times there's not a whole lot left to say about construction I guess. 

Weirdly awkward photo, but aren't the rhodies pretty?\
Except that I raised the neckline about an inch and a half.  This feels a lot more work appropriate to me.  Unfortunately I think that this modification has somehow introduced an excess of fabric just below the shoulder and above the boobage creating a liiitle bit of fabric pooling.  
Are you staring at my boob pooling?  Gah! Don't look!  Just kidding; go ahead
I have a hunch that if I take out a smidge from the front shoulder and maybe level out the slant a bit (square shoulders + slanted pattern pieces = no bueno) it should fix the problem.  How long has it been since this pattern at all resembled the Darling Ranges dress?  And how weird is it that I never actually made up the pattern as written with the dirndl skirt and side pockets and everything yet I've made so many modified versions?

One thing I haven't done but need to: SWAYBACK ADJUSTMENT!!!!!
  Since spring has been doing it's violent meandering thing lately (meaning that it was 80 degrees two days last week, raining balls and cold today, and a little bit of everything between has happened between the two including crazy gale force winds that take down trees!) I realized I have a serious dearth of summer tops in my meager wardrobe.  Is that the longest most pointless sentence you've ever read?  I'll bet it is.  This pattern is great sleeveless.  It's got just the right amount of coverage and binding the armholes with bias tape instead of the pure evil that are facings is genius.  Easy peasy =


You can sort of see the totally randumb green thread I used for everything: topstitching, sewing on white buttons, etc.  I had this thread leftover from... something.  I couldn't find any white thread and I wanted to sew noooow.  So I grabbed this not-really-matchy avacado green thread and I thought it would stand out.  It turns out nothing stands out agains this crazy paisley haha!  This picture totally fails to show you two important features of this top.  First, I used all different buttons.  They're all white, they all have two holes, and they're generally the same size, but they're all slightly different.  This was (believe it or not) intentional.  I've seen some reeally bold mismatched buttons here and there lately and it's a look I can get into, especially seeing as how I bought a huge bag of assorted buttons from Goodwill awhile ago and am slowly realizing how few matching sets there are :P

This photo has nothing to do with what you are about to read but it;s wonderfully awkward non?
The second thing this picture fails to really show is the total lack of matching up of those under bust seams is happening here.  See my fingers?  That's where the seams are.  Yeah, I know.  WTF?  Where was I looking when that happened cuz usually I'm all over that one thing.  If nothing else I at least try to match up those big seams.  By the way, the photo above has nothing to do with this paragraph, I'm just trying to stick to the format: paragraph --> picture ---> paragraph---->  etc, etc....


Time to Make: 4ish hours over two days

Cost: Basically free, fabric, buttons, interfacing, pattern, and even weird green thread all from stash

Verdict:  Isn't it obvious?  I love it

Make it again?  Again and again and again


Tuesday, March 5, 2013

School girl top

Disappointment (noun):

Attempting to make a sophisticated bow tie blouse top a la Winnie of  Scruffy Badger and ending up with something more like a crappy version of Sailor Moon's school girl shirt.


Inspired by Scruffy Badger's excessive number of bow tie blouse patterns I decided I wanted one of my own.  But, you know, I really can't be arsed to buy a new pattern and make a toile and all that so I just modified the Darling Ranges pattern to extend to become a shirt and added on a tie.  So what went' so wrong? 

In a word:  Everything.


First of all this fabric is super slippery and I sewed the bust darts all messed up.  How?  When I've made this pattern so many times how did I fuck up so early on in this one?  I don't know.  Then I totally misjudged the length of my torso which landed the vertical darts way too low.  No big deal, right?  Just get out the seam ripper and fix it.  But when you use the pink chalk that doesn't wash off on the wrong-side-turned-right-side of your fabric it becomes a big deal.

That's all I'm even going to bother to say about this shirt other than this:  It looks better under a blazer.


Sunday, February 17, 2013

purple pantomime

Nothing about this involves a pantomime.  It's just a word I enjoy and I thought you would, too.  You're welcome.


I could lie and pretend like this is a different pattern, but would you believe me?  This is, in fact, yet another rendition of the Darling Ranges pattern.  What can I say?  I'm stuck.  It's a nice basic pattern that is easily adaptable.  As you can see this time I've taken it up a notch and added a collar.


I still haven't looked into the swayback adjustment, though.  Nor have I bothered to wash, de-lint, or iron this dress.  My bad.  Let's move on though, shall we?

Yes my legs are really that white.  Welcome to Seattle.
I've gone with an A-line skirt again with pockets (gotta have pockets) and used the collar from   Butterick B5030.  The collar came out... erm... bigger? pointier? than expected.  It's okay though I guess.  I might modify it next time (yes, roll your eyes if you must, but there shall be at least one more of these).

This is my pensive face.  Thinking of all the darlings to come...

One thing I didn't do but I wish I had is interface the button bands.  I did that on my last rendition which you actually haven't seen yet (yes there's another one!) and it really makes a huge difference.  The material is heavy enough I didn't think it needed it but I'm adult enough to admit when I'm wrong.

I suppose a good blogger would've ironed out the most obvious wrinkles first.

The Reader's Digest Complete Guide to Sewing is one of the few sewing books I have (for realz guys I've got 3 all together!) and I've been working on reading through it.  It's a big book, so it's quite the endeavor.  I used all the info it had on rolled collars, though, and I'm glad I did.  It actually recommended stitching the seam allowance just to the under collar, which I considered but obviously didn't do.  I couldn't figure stitching into that crazy point!  I just went for plain old topstitching instead.  Please don't laugh at my wonky stitches; my machine is old, that's the best I can get out of it.

I know I love to see the guts so here ya go.

Guts...  BRAINZZZ....

Check out how cute my pockets are!  I used contrast bias tape to finish the pocket edges and the neckline because, again, too lazy to be arsed with making self bias tape when I had some bias laying about.  The collar is just sewn to the neckline and then everything is finished as usual.  It's a nice, easy, clean finish.  Forget facings!

More guts.

Fabric: thrifted sheet.  I'm hoping to move onto real fabric sometime soon.  Up til now I've felt that my skills were far from doing justice to anything nice, but I'm building up some confidence.
Notions: thrifted buttons from the huge bag o' buttons for 99 cents and some bias tape scraps from other projects.
Pattern: Darling Ranges, as I've mentioned, with a self drafted skirt and pockets, collar from Butterick B5030
Time to Make: I've been working on this dress in spurts since Tuesday!
Make again: Must you ask?

This picture is totally unnecessary but I love it so I had to include it.  All the stitching is black with black buttons to match.  I'll pretend that this was a design element, but I was really just too lazy to go buy matching thread.  I actually ended up liking it.  Now my dress matches my shoes!


All in all, I'm pretty happy with this dress.  It could be a bit better, but it'll do.  Maybe I can do something about the button band later.  Perhaps my sewing book will give me the answer if I keep reading...

Monday, February 4, 2013

vintage modern post script

never let it be said that i'm the kind of girl who can write a note without a post script or two.  i can hardly leave a room without going back for my phone.  all this being said...

p.s.to the dress

firstly, an explanation of the original title.  the tag on the sheet was labelled vintage modern, so i suppose the print is supposed to invoke vintage?  i just think it looks like somebody went to town on a spirograph


next, i think i've solved the sleeve problem.  i hate zigzagged edges and i didn't think french seams would work so i flat felled the sleeve seams.  it worked (yay!)


but you can see the weirdness around the neck...

of course you can't see it when it's on, especially in this weather since a sweater is a necessity


i feel like this sweater and this dress were made for each other.  of course that's silly since i made this sweater a couple of years ago before sewing really existed as a hobby for me.

all the seams on this dress are french or flat felled.  the pocket edges are finished with matching bias tape.  pretty insides =)


and a shot of the back because omfg i love this sweater.  whenever i wear it people say you made that?? no way!  you could sell those for like $100.  of course the yarn alone cost almost $100 soo... not so much


i'd never heard of "put a bird on it" when i made this sweater so the whole bird thing may become passe i don't even care i love this sweater!  i don't know about the belt though.  i was inspired by an outfit sewaholic posted.  i've never been much of a beltforreasonsotherthantoholdupmypants sort of person so i'm still working on it.

Edited to add (see I told you) that I'm linked up at Sew Cute Tuesday at Better off Thread for the first time.

Sunday, January 27, 2013

vintage modern darling

I don't recall who said it but blog guilt is a strange beast.  Why do I feel guilty?  To whom exactly do I apologize for blatant blog absenteeism?  Poor light conditions?  General disappointing imperfection?  Redundancy and repetitiveness?

I don't know, so I'll just go ahead and apologize once for my truancy, the light (or lack thereof) in Seattle in January, and the fact that this is yet another rendition of the Darling Ranges dress.

here i am looking incongruously badass on a field of rainbow hearts 
The thing I like about this pattern is that it's simple to alter.  It's just a basic button-up dress without a lot of fuss.  I've used it to make shirts so far but this time I did a full skirt with pockets...  you know, like the kind pants have.


The original pattern has a rectangular gathered skirt (a dirndl I think it's called) with pockets sewn into the side seams.  I only sewed it up like that once for a muslin and decided it wasn't my style so I used the skirt pieces from another pattern and drafted my own pockets (which are finished with bias tape ooh lala so fancy).  I've used that pocket piece on several pairs of pants and skirts and I don't like it.  I like this kind of pocket better.  They stay put and don't bulge out or pull down oddly.


I'll try and do a swayback adjustment on my next one, I'm not diggin' all those wrinkles on the back.


You can't really see the pattern on the other shots so here's a better look.  You can also see my fish mobile (which never got a blog post but fully deserves one) and my little helper.  That's what I'm looking at by the way.

The material was a top sheet from Goodwill.  I do have some nice fabric but I'm in that awkward phase where I'm too chicken to use it.  What if I ruin it!?  I keep telling myself once I get some more practice...


I've modified the pattern pieces so many times it's hard to say what other changes have happened on the bodice.  You can see my awesomesauce pockets though.  Yes!  I did have some weirdness around the neckline and had to turn under the neck edge (after I'd already finished it with bias tape!) and sew it down.  It's all right, but doh!  I don't know why this one time it came out all wonky and gapey.  My computer insists gapey isn't a word but I beg to differ.


I never can get the twirly shots to work but it's twirly!

All in all I'm happy and I will continue to use this pattern to death.  For the price I certainly intend to get my money's worth!  (I'd like to add that this pattern is obviously awesome and worth the money.  That's why I keep using it.  Plus, supporting indie designers instead of the big evil corporate pattern makers.  It's a win-win).  Total cost: $2.75 and there's enough fabric left for a skirt.

Tuesday, September 11, 2012

darling revisited.


The pattern should be all too familiar by now... or is it?  Yet another Darling Ranges (not) dress.  This time, since I'm obviously not pregnant (hopefully it's obvious anyway) any more I modified the front the same way as the back.  That is, instead of being big gathered rectangles under the bodice pieces instead the pieces are fitted and shirt length.


A bit too fitted, unfortunately.  This is the first time I've used this pattern since having the baby so I wasn't sure what I was doing.  Obviously the biggest issue is that another (larger) FBA is in order but a bit more room in the hips would be good too.


All in all, though, I'm pretty enamored of this shirt.  Perhaps someday it will actually fit =(


I actually cut the back as one piece so I wouldn't have to worry about pattern matching or any such silliness. I think it'd be really cute with the top back bodice split into a yoke sort of deal.  Am I going to make more of these with a revised pattern?  You bet! 


Look at those pretty insides!  All flatfelled seams except for the underbust seam...


...and the set in sleeves.  I couldn't figure out what kind of seam finish would work here so I just zigzagged the seam allowance.  It makes me sad they can't be all purdy like all their neighbors =(  


Isn't there a better way?

Summary:
Pattern: Highly modified Darling Ranges dress by Megan Nielsen
Fabric: Some yardage from the thrift, about half of what was there.  A thin, crisp, cotton I think.  $4 or $5 for the whole thing and I used about half.
Notions: Buttons from the stash. Free since I don't know where they came from.  I certainly didn't pay for them.
Techniques used: Buttonholes, flatfelled seams, bias tape neckline and bound seams
Hours: A few...  Not really too bad, though
Will you make this again? So many times.  I'm pretty sure
Total cost: Half of $5: so $2.50
Final thoughts: I love it, I hope I lose some weight and can wear it all buttoned up proper

Tuesday, June 26, 2012

retro darling.


Now with sleeves =)  Yet another maternity top based on the Darling ranges dress pattern.  I used the same old pieces; nothing new.  That is, I used the same pieces I used for this one, meaning the back is cut out with curved sides as opposed to back darts.  I think I may have added a bit to the FBA over DR the first, though it's definitely not the hot mess I ended up with on the second one.

I think?  That's right...  This top has been in time out for at least two weeks.  Why?  Because as I finished sewing the seams on this top I had two revelations: this material is polyester (I think, it seems to fit with the print, no?) and polyester does not stretch.


I saw the material at the op shop and resisted it for two weeks.  Finally the oh so '60s retro print won out over my common sense and I bought it.  In the store I actually thought it was brown, red, orange, and white.  Upon closer inspection in better light I believe it is purple, not brown.  I wish it was brown though =(  Wouldn't that be an awesomely unusual (and just bearably awful) color combo?


You can kind of see that there's a lot of fabric pooling on the lower back, which I've noticed a problem with before.  I have no idea what to do about it though =(

Obviously a pattern this crazy needs a simple pattern with clean lines.  That's what I love so much about the Darling Ranges pattern; the busier the fabric the better!  It just works.  At least I think so and a few other people do too.


Of course there's nothing to be done about looking like a giant beach ball at this point...

Unfortunately this material, as I mentioned, does not stretch as much as cotton does.  I've always heard that woven fabric doesn't stretch, but it's a lie!  It looks like buttons are about to go flying.  I don't think they are, but it hurts my self esteem to see people donning safety goggles at my approach.  You can kind of see that here, but it doesn't look as bad as I imagined, so maybe it isn't?


I love it anyway.  I can't wait til I can wear it.  That's right, I don't care it's supposed to be maternity wear.  I fully plan on rocking this shirt post-baby.  As a matter of fact I might even decide I don't care about potentially dangerous projectiles and wear it now!  The print, the pattern: it's just so retro.  Since it seems to be synthetic I expect it won't breathe well but I've worn it around the house quite a bit and have no evidence to support those fears.


I went for bright red topstitching just to jazz things up a bit.  I love the way it looks, I think it really brings out the red/orange part of the print.

One of my absolute favorite things about this shirt is that the fabric seems to be actually retro; like decades old!  It certainly smells like my great grandmother's house when it's ironed.  It's like a time capsule, but more fun because it's crafty =)  I also used some more old stash buttons.  I would've used bright red to match the thread if I'd had enough of those.  Interesting thought: the buttons may actually be the same age as the fabric.  Yay for using what ya got and making do.  BTW where did all these buttons come from?!