Tuesday, April 30, 2013

Disappointed but not defeated (yet)


I went to so much trouble on this dress.  There's all kindsa hand stitching.  I even made a partial muslin (sort of...  I made the lining first to see if it would fit.  I resewed all the bodice seams when I realized I'd sewn them at 3/8" instead of 5/8".  I resewed those curvy princess seams that were all wonky.  I redid the neckline like three times to lower and even it....


And....
I can't lift my arms above my head.
Stay tuned for the sleeveless version.

Hopefully it'll be done in time for some Me Made May action (gah it starts tomorrow!  So excited!)

Saturday, April 20, 2013

Periwinkle Tie Tee

I'm trying to finally start working on the huuuge pile of garments I have earmarked for refashions.  This top started life as a large gathered skirt, so lots of fabric to work with.  I do wish I'd remembered to get a before pic, because before and after pics for refashions are always such fun!  Alas, you'll have to settle for just the after...


I took my basic tee shirt block and altered it to make this top.  It mostly just involved turning the scoop neck into a V-neck and making a tie instead of the neck band.  Note, that for whatever reason the front on these shirts (that's right, there's a whole other one of these you haven't even seen!) so add some length accordingly.  If you wanna be super fancy add length and a dart.  I don't know why this pattern doesn't quite work as easily as the scoop neck, but both versions I've made could've used just enough length in the center front to warrant a bust dart.


For the tie I just measured the neckline, multiplied by .85, then added to that the length I wanted for the ties. In this case, I actually just went with "as long as I can make the ties without having piece them" which, as it turns out, is just a wee bit short for a full bow.  It makes kind of a cute mini bow, though, if I can be arsed to actually tie it.

I can't recall where I got the 85 percent rule... but it's almost always spot on.  How long do you make that neck band?  Just measure the neckband and multiply by .85 et voila!  That is how long to make your neckband.  It's only failed me once, and in that case there was some very stretchy waffle knit jersey and some almost equally stretchy rib knit.  (Post on that whole mess coming soon.)


This material is very drapey (almost, dare I say it: slinky?) but also very synthetic.  It flows and gathers nicely (those aren't actually gathers, btw, it's the way the fabric is made), but I definitely won't be wearing it during summer.  Of course, summer has yet to even think about hitting Seattle, so I'm confident this will get plenty of wear for Me Made May!


The weird ripple of this fabric made it come out kind of wide.  I ended up taking it in quite a bit at the waist... but I think I angled out too much for the hips.  You can see above it stands out a bit.  But peplums are still in right?  And I don't think it bugs me enough to actually switch out the thread and needle in my machine just for that!  You'll probably see more of these as I come across appropriate knits.  It's as comfy as a tee shirt but the tie brings it up to business casual level (Seattle business casual, anyway, which is pretty lax).  Maybe I'll even post the first one I made eventually! 

Thursday, April 18, 2013

Thrifty Thursdays

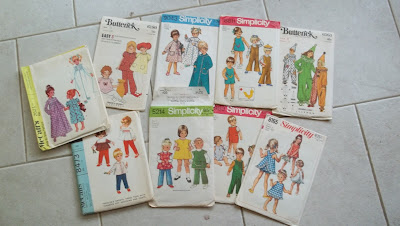
I got this huge pack of ten baby girl patterns (and one weird 80s dress pattern) for one or two dollars.


Why are there only 9 here?  Because I already made one of them and it's now floating around my sewing room somewhere.  These patterns are all from a similar time period, but not exactly the same year.  Since they are all the same size, I believe that these came from a person who collected vintage patterns, as opposed to being from the original owners. 

That's cool, though, I don't care.  They are just exactly baby girl's size, so I better get crackin'

Wednesday, April 17, 2013

Me Made May

I started sewing/blogging just about a year ago now.  I remember seeing everyone with their Me Made May posts and being all jealous I couldn't play.  Of course, I'd been sewing a couple of weeks so I really wasn't prepared.  But this year?  Oh, this year it's on like Donkey Kong.

me-made-may'13


I, annanic of Reloved, pledge to wear at least one handmade item each day for the duration of May 2013.

I wear my handmade stuff pretty regularly, but since I still just don't have that much I think this will be a reasonably challenging goal.  Especially since I won't count hats/gloves/scarves, although I may mention it.  Speaking of which, I will also try to do daily outfit pics with weekly posts.  Since I've been a bit (aherm, read: way behind) on my blogging lately I think this will be the biggest challenge.  Hopefully it will help me learn to fit blogging into my schedule a little bit better, though.

Are you in for Me Made May?

Monday, April 15, 2013

Diamonds & (herring)Bones


The herringbone quilt is finally finished. This was a present for my mom for her birthday (which is at the end of February) and I just finished it on Easter Sunday. Clearly I am behind. This whole work thing is really cutting into my sewing time :(


This quilt may be a little... Shall we say imperfect and leave it at that? There are some puckers here and there, especially on the back, but I'm having trouble caring. Truth be told I'm pretty well chuffed with it. And of course my mom loves it and it is highly soft and cuddly so I'm calling it a win.


I found the tutorial for the herringbone pattern online. You actually just sew all the little strips together at an angle then cut out rectangles from your long line of strips... Which is pretty ingenious but for one thing: how does one make it so that all the rectangles end up with the same angle? In theory it's not that difficult to figure out, but for myself, master of meandering seam allowances, in practice it didn't work out so well.


All the little strips are actual scraps (as if you couldn't tell!) and the border is just the big pieces I had left of that sheet after hang it for a skirt and a shirt. It was a really big sheet. It's really soft but it's pretty freaking slippery and distorts easily. I knew it would be a pain to use on a quilt but it was just laying around with no clear purpose so in it went!


That means that this whole quilt top was basically lying on my sewing room floor. I would tell you that it's nice to be able to walk through my sewing room again, and it was while it lasted. But remember I said I finished it Easter Sunday which means there are already lots of brand new scraps impeding progress.


For the back I bought this incredibly soft, thick cotton sheet... From goodwill for $2 of course. The colorful floral sheet I originally bought to back it accidentally turned into a dress (so sorry I'm not at all sorry mom!) but I like this better anyway. The front of the quilt is so busy I think the low volume on the back works better.


The binding is a dark purple cotton (sheet again) that's I've already used to make a skirt and a dress. I already told you: I use all the parts!


For the quilting I did a sort of random diamonds and zigzag thing for the border (is that called sashing? I don't even know) and a slightly less random diamond and zigzag thing on the herringbone part. I feel like I need to read up on my quilting terminology before my next quilt... But that'll probably be a long time coming so I won't worry about it just yet.


Just how long did this quilt take? I started cutting and sewing the strips before baby girl was born and she's almost 9 months now so... A long ass time basically.  I wasn't actively working on it that whole time, but I knew it was there unfinished the whole time.  What, you don't feel like your WIPs are lurking in the background, waiting??

But anyway, I feel like it was worth it though and I will definitely make more quilts in the future. It does not seem likely, however, that I will become one of those people who buys fabrics specifically for quilting. Maybe one or two fat quarters here and there, but I have waaaay too many scraps to justify that sort of thing. Quilts to me are just a warm, cuddly (&useful) way to clean up my sewing room floor. In case you hadn't noticed I never throw anything away so I'm a big fan of scrappy projects.


I've already started thinking about my next quilt so I guess you can be looking for that in another 9 months or so :P It will almost certainly be another string quilt so don't get too excited haha!!

Saturday, April 13, 2013

how do you catch a unique rabbit?

you 'neak up on it....


how do you catch a tame rabbit???


tame way =)

a long distance friend of mine commissioned me to knit this sweater at the beginning of February and I took on the challenge.  She wanted a sweater with a hood with bunny ears.  No big deal right?  Of course such a pattern does not exist (should you be curious) so I had to make one up based on the measurements she gave me.  After lots of work and collaboration it finally lives! Her post is here should you want to see more pics.  I totally ganked that pic; hope you don't mind chica!

i based the ears off of this pattern, but increased for a wider middle ear and made them a whole lot longer.  the sweater is just a basic bottom up raglan with colorwork bunnies on the yoke.  the yarn is a lovely recycled angora/cashmere/wool blend that is soooo soft and yummy!  I was saving it for a sweater for myself, but i guess this is the next best thing ;-)

total sweaters completed this year: 2 out of 12.... i'm already thinking i might not make it!

Wednesday, April 10, 2013

Something a little different....


Picture above:  Sewaholic Thurlow pattern, freshly sharpened scissors, and some fabric I'm just itching to cut into.

This pattern traveled all the way from Vancouver, B.C. to merry old England and then came all the way back to land in Seattle.  Thanks again Jane; I can't wait to start working on this one to feel like I earned it!

The scissors I just had sharpened at the local hardware store.  I love the feeling of supporting local businesses while also not buying new scissors just cuz my old ones are dull (yes, there was a time in my life when I didn't even know you could get scissors sharpened!)

The fabric is a thrifted sheet.  It seems to be a cotton/rayon blend, though it's not labelled.  I'm struggling with the decision of what to make; the hand makes me think it would be good for a blouse as it's lightweight and a bit crisp, but I really want to make a dress.

Oy, I've got lots of finished things to show off, but I can't seem to ever manage to get pictures =(  Rest assured, some day soon there will be lots of FOs here.

Tuesday, April 9, 2013

Thin mints

In honor of the boy's first Girl Scout cookie season.... No he's not in Girl Scouts, but he's eaten enough Girl Scout cookies this year to qualify as an honorary scout, I'm sure.  These were an emergency project.  Emergency in that the boy really needed new pants (he's outgrown all his old pants in one fell swoop).  Also emergency in the sense that I was in the middle of the epic quilt and really needed a break.  

Exploring
I cut these out one Friday night and sewed them up in a couple of hours the next day, still leaving time for a bit of quilting.  I'm still using the same pattern (Little Heartbreaker pants from Sewing for Boys) but the next size up.  I'm not 100% sure what size they are, I think 4/5 but it might be 6/7.  Mommy brain, what can do man?  

I'll be honest. I know I've used this pattern so many times nobody ever wants to see it again.  But it's just perfect.  Like I have no desire to ever sew other boy pants kinda perfect.  That's real love, man.


The material is this chocolatey brown corduroy from Joann's (for shame, I know... but I bought it ages ago and it's not saving the planet any where it is so....)  I had just tiny little scraps of the green left over from a variety of muslins and quilts.  I made flat bias tape (or non-bias tape as the case may be) and used it along the cuffs:

he is actually sitting still here.  the only word for this is: miracle

Along the waistband, between the pockets and pocket facings:


 ...And to finish the edge on the pockets.  I also used it for all the facings.  And the topstitching is totally the same shade of green!  I wish I had a picture of the inside cuz we're talking major color coordination up in here.  On the outside, though, I think the accents are pretty subtle.  This pretty much ends that green king size sheet.  Finishing a fabric down to the very last little usable scrap is sooo satisfying.

I was fortunate enough to receive some excellent advice from the ladies who wrote the book (no really, they actually wrote the book Sewing for Boys).  Instead of following the directions for the waistband, I attached the waistband facing first.  Then I flipped it over and sewed the outer waistband down from the outside.  It made for a nice easy finish; much neater than my original efforts

Building
 Obviously I've made this pattern enough times before that there's not much else to say about these.  Except that I bought waaaay more fabric than I needed.  I think I bought the amount called for in the pattern, but if so then it's definitely a generous overestimate.  I can't decide if I want to make a skirt out of it or another pair of pants.  He definitely could use more pants.  But then again Me Made May is coming....

Breakdancing????
 As you can see they have passed the test of usability.  They're good for all your average daily duties of a three-year-old.... and then some =)

Elephant riding mensahib
Once again, I give this pattern an A++

Thursday, April 4, 2013

Thrifty Thursday: The Owls Have Eyes

How stinkin' cute is this fabric?  Even cuter is that the boy wore it around like a cape the day I brought it home.  I could barely get it away to wash.  Shown with an Easter egg for scale.


It was three or four dollars for a bunch of this stuff.  Like enough that I'm wondering if this could be acceptable as mommy clothes....

Maybe not.  But definitely appropriate for a little boy.

Wednesday, April 3, 2013

Wip Wednesday: sweater edition

It's nice to get around to working on something for me :) Now to just not get distracted....

Monday, April 1, 2013

Baby Girl Easter Dress

What would Easter be without the toke last minute must finish super cute baby girl dress?  Relaxing perhaps?  Even, dare I say it, easy?


I wouldn't know obviously.  The day before (I thought) Easter I decided baby girl absolutely must have a cute little dress made by her mama.  The fact that I scored a bunch of vintage little girls patterns in just about her exact size really sealed the deal though.  I rushed all day Saturday to get this dress done and was on track when I was informed that Easter was actually the following Sunday.  Derp.  So I took my time, hand stitched down the hem and the lining (on the bus on the way to work!), and finished it punctually enough the day before Easter.  Was it worth it?  Not really.  She couldn't crawl effectively and she ruined the entire outfit (and her shoes) trying to eat lots of candy and crawl around on the patio.  Am I a better mother for this?  Doubtful.  Does she care at all about cute little dresses?  No, she'd much rather roam naked and wild and free.


But I can look back on these pictures in a few decades and gush because: soooooo much cuteness!!!  So maybe it was worth it after all...